BI Publisher Scheduler Configuring - 10G
This task involves the following steps
a. Open command prompt and browse to OracleBI/web/bin directory.
 b. Enter command “cryptotools credstore –add”

c. Enter the path of credentialstore.xml file. By default it is located in OracleBIData\web\config folder.

d. Enter a credential Alias which would be used in instanceconfig.xml
e. Enter Administrator’s Login ID and Password.
f. Once this is done enter the following lines in instanceconfig.xml
<reportingengine>XmlP</reportingengine>
<volume>XmlP</volume>
<serverurl>http://localhost:9704/xmlpserver/services/XMLPService</serverurl>
<weburl>http://localhost:9704/xmlpserver</weburl>
<adminurl>http://localhost:9704/xmlpserver/servlet/admin</adminurl>
<admincredentialalias>Biadmin</admincredentialalias>
</advancedreporting>
<credentialstore><credentialstorage type="file" path="Z:\OracleBIData\web\config\credentialstore.xml"></credentialstore>
p.s. replace localhost with the servername on which oc4j is loaded.
g. Make sure the <AdminCredentialAlias> matches the one created in step d and the path of Credential Store is mentioned correctly.
h. Restart Oracle Presentation service.
 c. This should open up the BI Publisher Screen. Click on Admin tab. (If required login with the same credentials as that of Analytics).

d. Click on JDBC Connection -> Add Data Source
e. Enter a name for the Data Source.
f. Select Driver Type as Oracle BI Server.
g. Confirm that the Database Driver Class is “oracle.bi.jdbc.AnaJdbcDriver”.
h. Enter the connection string as jdbc:oraclebi://<host>:<port> where host is the server on which Oracle BI server is installed. By default the port number is 9703.
i. Enter the Administrator credentials and Click on Test Connection
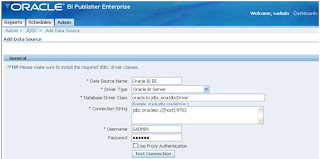 j. Confirm that the connection is successful and Click Apply.

b. Enable Super User and set User ID/ Password for it.
c. Select Oracle BI Server in Security Model.
d. In Connection String enter the same connection string as entered in 4-h.
e. Enter the User ID/ Password of rpd Administrator.In Database Driver Class enter oracle.bi.jdbc.AnaJdbcDriver
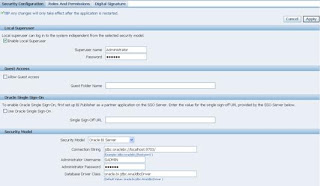 g. Click Apply.
h. Restart the oc4j server (restarting of xmlpserver from the applications tab of oc4j admin screen is also sufficient for changes to take place)
 c. This should open up the BI Publisher Screen. Click on Admin tab.
d. Click on Integration -> Oracle BI Presentation Services
 e. Select server protocol as http
f. Server Version as v4
g. Server field should contain the server on which Oracle BI Presentation service is loaded.
h. Port should be 80 if analytics is using IIS or 9704 if analytics is using oc4j
i. Enter the rpd Administrator’s User ID / Password
j. URL suffix should be analytics/saw.dll
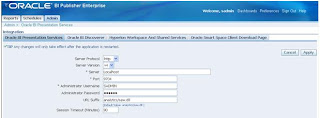 k. Click apply.
l. Restart the oc4j server (restarting of xmlpserver from the applications tab of oc4j admin screen is also sufficient for changes to take place).
 c. This should open up the BI Publisher Screen. Click on Admin tab.
d. Click on System Maintenance -> Scheduler Configuration
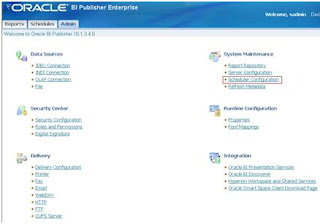 e. We need a database to use scheduler. This database will be used to store the information of various scheduler activities.
f. Select Database type
g. Connection String for Oracle and MSSQL is given below:
Oracle
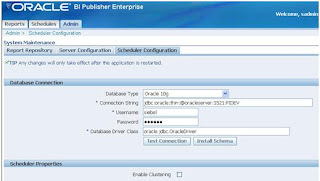
h. Click on Install Schema.
i. Click Apply and restart oc4j or xmlpserver.
j. Important: If you stop and start or restart the database that contains your BI Publisher Scheduler tables, you must restart you BI Publisher Enterprise server.
(OR)
OBIEE - Configuring the publisher/scheduler for MySql
- Create administrator alias in credentialstore.xml and update instanceconfig.xml
- Create BI Publisher groups in rpd and assign appropriate users to the groups.
- Setting up the Datasource to point to Oracle BI Server.
- Set up the Security Configuration to use Oracle BI Server Security Model
- Set up the Integration – Oracle BI Presentation Services
- Set up the Scheduler Configuration
1. Create alias in credentialstore.xml and update instanceconfig.xml
BI Publisher uses Impersonation to get authenticated with the BI Server. The first step towards it is to add an alias in credentialstore.xml.a. Open command prompt and browse to OracleBI/web/bin directory.
 b. Enter command “cryptotools credstore –add”
 c. Enter the path of credentialstore.xml file. By default it is located in OracleBIData\web\config folder.
d. Enter a credential Alias which would be used in instanceconfig.xml
e. Enter Administrator’s Login ID and Password.
f. Once this is done enter the following lines in instanceconfig.xml
<reportingengine>XmlP</reportingengine>
<volume>XmlP</volume>
<serverurl>http://localhost:9704/xmlpserver/services/XMLPService</serverurl>
<weburl>http://localhost:9704/xmlpserver</weburl>
<adminurl>http://localhost:9704/xmlpserver/servlet/admin</adminurl>
<admincredentialalias>Biadmin</admincredentialalias>
</advancedreporting>
<credentialstore><credentialstorage type="file" path="Z:\OracleBIData\web\config\credentialstore.xml"></credentialstore>
g. Make sure the <AdminCredentialAlias> matches the one created in step d and the path of Credential Store is mentioned correctly.
h. Restart Oracle Presentation service.
2. Create BI Publisher groups in rpd and assign appropriate users to the groups
a. Create the following groups in rpd to correspond to BI Publisher functional roles
- XMLP_ADMIN – this is the administrator role for the BI Publisher server.
- XMLP_DEVELOPER – allows users to build reports in the system.
- XMLP_SCHEDULER – allows users to schedule reports.
- XMLP_ANALYZER_EXCEL – allows users to use the Excel analysis feature.
- XMLP_ANALYZER_ONLINE – allows users to use the online analysis feature.
- XMLP_TEMPLATE_DESIGNER - allows users to connect to the BI Publisher server from the Template Builder and to upload and download templates.
b. Assign users to appropriate groups. There should be at least one user in XMLP_ADMIN.
c. Restart Oracle BI Service.
3. Setting up the Datasource to point to Oracle BI Server
a. Login into the analytics application as an administrator.
b. Click on More Products -> BI Publisher
d. Click on JDBC Connection -> Add Data Source
e. Enter a name for the Data Source.
f. Select Driver Type as Oracle BI Server.
g. Confirm that the Database Driver Class is “oracle.bi.jdbc.AnaJdbcDriver”.
h. Enter the connection string as jdbc:oraclebi://<host>:<port> where host is the server on which Oracle BI server is installed. By default the port number is 9703.
i. Enter the Administrator credentials and Click on Test Connection
4. Set up the Security Configuration to use Oracle BI Server Security Model
a. Click on Admin tab -> Security Configurationb. Enable Super User and set User ID/ Password for it.
c. Select Oracle BI Server in Security Model.
d. In Connection String enter the same connection string as entered in 4-h.
e. Enter the User ID/ Password of rpd Administrator.In Database Driver Class enter oracle.bi.jdbc.AnaJdbcDriver
h. Restart the oc4j server (restarting of xmlpserver from the applications tab of oc4j admin screen is also sufficient for changes to take place)
5. Set up the Integration – Oracle BI Presentation Services
a. Login into the analytics application as an administrator.
b. Click on More Products -> BI Publisher
d. Click on Integration -> Oracle BI Presentation Services
f. Server Version as v4
g. Server field should contain the server on which Oracle BI Presentation service is loaded.
h. Port should be 80 if analytics is using IIS or 9704 if analytics is using oc4j
i. Enter the rpd Administrator’s User ID / Password
j. URL suffix should be analytics/saw.dll
l. Restart the oc4j server (restarting of xmlpserver from the applications tab of oc4j admin screen is also sufficient for changes to take place).
6. Set up the Scheduler Configuration
a. Login into the analytics application as an administrator.
b. Click on More Products -> BI Publisher
d. Click on System Maintenance -> Scheduler Configuration
f. Select Database type
g. Connection String for Oracle and MSSQL is given below:
Oracle
- jdbc:oracle:thin:@<hostname>:<port>:<oracle SID>
eg. jdbc:oracle:thin:@oracleserver:1520:TEST
p.s. TEST is the SID, its alias in tnsnames should not be used here.
- jdbc:hyperion:sqlserver://<hostname>:<port>;DatabaseName=<DATABASENAME> eg. jdbc:hyperion:sqlserver://mssqlserver:1433;DatabaseName=INFA1
h. Click on Install Schema.
i. Click Apply and restart oc4j or xmlpserver.
j. Important: If you stop and start or restart the database that contains your BI Publisher Scheduler tables, you must restart you BI Publisher Enterprise server.
(OR)
OBIEE - Configuring the publisher/scheduler for MySql

No comments:
Post a Comment